

The Warden boss guide: prison shield fight and Kang’s tag
Prison blocks and the Citadel are different approaches · Avoid spending the magazine into the shield · Reported tag name: Kang’s Dog Tag
Do not spend your whole magazine shooting the front of the Warden’s shield. The practical problem is getting an exposed firing angle while surviving the guards around him. Start by identifying whether your target is in the prison blocks or deeper in the Citadel; those approaches need different preparation.
- Prison blocks and the Citadel are different approaches
- Avoid spending the magazine into the shield
- Reported tag name: Kang’s Dog Tag
Do not spend your whole magazine shooting the front of the Warden’s shield. The practical problem is getting an exposed firing angle while surviving the guards around him. Start by identifying whether your target is in the prison blocks or deeper in the Citadel; those approaches need different preparation.

Prepare the target and replacement kit
| Hunt decision | Check before committing |
|---|---|
| A chosen Lieutenant | Read the Boss Board card, unlock and purchase its intel if available; do not invent a chapter requirement |
| A tower hunt | It identifies the nearest active Lieutenant, which may be a different target |
| The result | Confirm the kill, inspect the actual tag and complete the extraction you need; other squads can hunt the same target |
Take enough ammunition for the guards as well as the Lieutenant, armor plates and Wound treatment. Preserve a fallback position instead of carrying only the equipment you expect to use for the last few seconds of the fight. The recovery plan helps decide when an expensive prison hunt would consume your only usable kit.
Read the actual prison location
A reported encounter uses a smoky mess hall in the 14th Political Prison blocks. The suggested landmarks are a fenced courtyard, single-storey buildings and dining tables. Those are search leads, not a guaranteed room or a surveyed entrance pin.
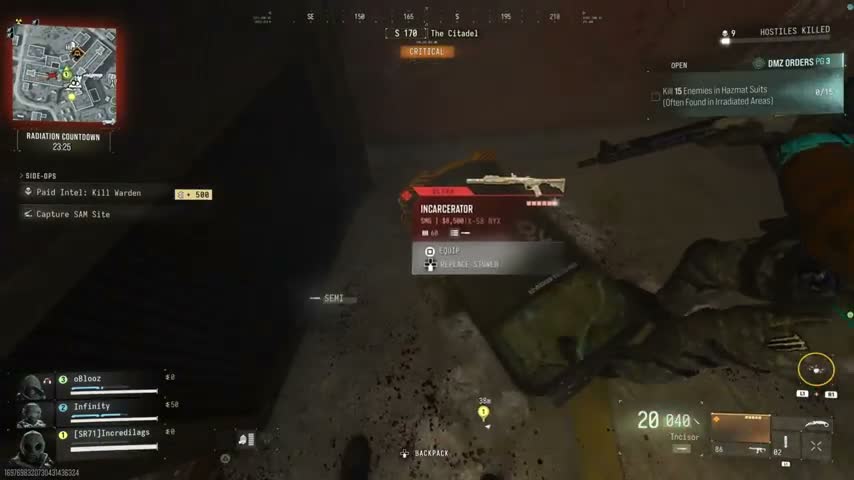
The inspected hunt instead shows The Citadel — Critical, Paid Intel: Reach/Kill Warden, smoke and an interior stair approach. Do not downgrade that encounter to the outer prison’s rating or walk deeper simply because another run met the boss outside.
Use the prison loot walkthrough only for its own doors, cores and control-room sequence. A power-control objective or armory key is not proof of a boss spawn, a required shield counter or a completed hunt.
Clear space for an exposed-side shot
- Remove guards threatening the courtyard or entry you are using. Keep corners and substantial walls available for recovery.
- Locate the shield and the routes beside it before committing to close range. Smoke can conceal guards as well as the target.
- In a squad, let one player hold the Warden’s attention from cover while a second takes a different angle. Shoot the exposed body rather than continue into the shield.
- Reload and repair armor from a cleared position. Stop the flank if another guard controls the crossing.
- Recheck the target before everyone moves forward to loot. A weapon on the floor is not proof the whole room is clear.
This is a positioning recommendation, not a guaranteed scripted lure. No verified grenade stun loop, shield-breaking damage value or fixed solo kill time is established. Solo, break contact and reposition only when a safe path exists; taking a squad is a more practical option than relying on an invented shield exploit.
Identify the weapon and tag separately
The inspected pickup is Ultra Incarcerator, built on the X-58 Nyx platform. Other reports describe a plain X-58 Nyx or a camouflaged Type 73. Treat those as differing recorded outcomes, not a guaranteed named weapon or a complete drop table.
The reported dog-tag name is Kang’s Dog Tag. Read the actual pickup instead of waiting for an item literally called Warden’s Dog Tag. That name does not make the hunt the same objective as escorting General Kang in Critical Extraction.
Leave with the result you needed
A Lieutenant tag can expose its carrier on the Tac-Map. Check the exit, healing and ammunition before taking it and extending the search. Kill XP, tag extraction, first-takedown rewards and selling the weapon are separate outcomes; do not promise their combined total as profit.
The Warden’s narrative connection to a sealed room beneath NuriGO Mall does not establish a verified inventory key or door route. Do not spend a different Mall key on that assumption. Store the useful drops after extraction and plan any keyed-room trip separately.
Quick questions
Is the Warden always in the same prison room?
No fixed room is established. A prison-block mess-hall encounter is reported; the inspected footage instead shows The Citadel at Critical threat. Follow the active target and banner.
Does the prison loot route guarantee access to the Warden?
No. Citadel power controls, keyed storage and a Lieutenant hunt are separate objectives. Follow their actual prompts and do not assume a loot-room key summons or unlocks the boss.
Mentioned in this guide
Spotted something wrong? Send a correction.
Keep reading
 Guide · Combat & survivalDMZ exfil guide: extraction methods and emergency plans Guide · Gear & craftingPrison loot route: K9 cores, armory key and security cells
 Guide · Getting startedMW4 DMZ Free Loadout guide: rebuild after losing your gear
 Guide · MissionsMW4 DMZ Critical Extraction: General Kang and rooftop rescue